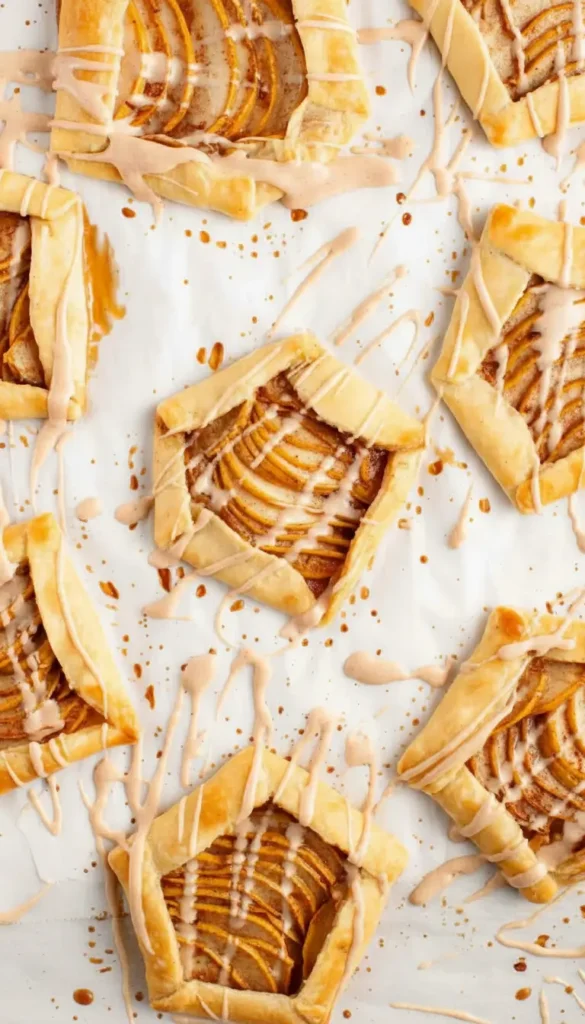
There’s something truly magical about a warm, flaky Easy Pear Galette emerging from the oven, its golden crust promising a delightful crispness, and the sweet scent of pears and cinnamon filling the air. This galette recipe is a testament to simple elegance, proving that you don’t need fancy techniques to create a dessert that feels utterly special.
I remember one crisp autumn afternoon, Jennifer’s laughter echoing through the kitchen as we baked our first pear galette. She made every baking project a joyful adventure. This rustic pear galette always brings back memories of those carefree days, sharing sweet treats with my dearest sister.
Just a Few Thoughts Before We Begin
- This rustic pear galette recipe is a must-try for anyone who loves pear dessert recipes.
- Easy Pear Galettes are the perfect pear dessert for any occasion.
- They offer a delightful balance of crisp pastry and tender, spiced pears.
- Using store-bought puff pastry makes this pear galette easy enough for weeknights, yet elegant enough for a special gathering.
- Follow our proven tips for a golden, crisp crust to ensure every bite is perfection.
What You’ll Need From Your Pantry (and the Store!)
- 1 sheet puff pastry, thawed
- 2 ripe pears, thinly sliced (Bartlett or Bosc work best)
- 2 tablespoons brown sugar
- 1 teaspoon cinnamon
- 1/4 teaspoon nutmeg
- 1 teaspoon lemon juice
- 1 tablespoon all-purpose flour (to prevent sogginess)
- 1 egg, beaten (for egg wash)
For the Glaze:
- 1/2 cup powdered sugar
- 1 tablespoon milk (or plant-based milk)
- 1/4 teaspoon cinnamon
- 1/4 teaspoon vanilla extract
My Favorite Kitchen Helpers for This Recipe
My Go-To Rolling Pin
A good rolling pin makes all the difference for getting that puff pastry just right, a trick Jennifer taught me!
My Trusty Pastry Brush
This little brush helps you get that perfect golden shine on your crust with the egg wash.
Let’s Bake! My Simple Steps to Pear Galette Bliss
Oven’s On & Pastry’s Ready!
Preheat your oven to a cozy 400°F (200°C) and line a baking sheet with parchment paper. Gently dust your counter with a little flour – just enough to keep things from sticking – and roll out your thawed puff pastry into a 12×12-inch square. Then, cut it into 4–6 smaller squares, depending on if you’d like individual mini galettes or slightly larger portions.
Those Sweet Pear Fillings, All Mixed Up
In a bowl, combine your thinly sliced pears with brown sugar, cinnamon, nutmeg, lemon juice, and that crucial tablespoon of flour. The flour helps absorb any excess moisture from the pears, ensuring a delicious and crisp crust for your pear galette. Toss everything gently until the pears are beautifully coated.
Crafting Our Rustic Pear Beauties
Spoon a small mound of your spiced pear slices into the center of each puff pastry square. Remember to leave about an inch border around the edges. Now for the fun part: carefully fold the edges of the pastry up and over the pears, creating that lovely rustic pear galette shape. Don’t worry about perfection; the charm is in its natural look! Finally, brush the folded edges with your beaten egg for a beautiful golden shine.
Into the Warm Oven, Watching for that Golden Glow
Carefully transfer your assembled galettes to the prepared baking sheet. Pop them into your preheated oven and bake for 18–22 minutes, or until the pastry is wonderfully puffed and a beautiful golden brown. Let them cool slightly on the baking sheet while you prepare the glaze.
A Drizzle of Sweetness: Mixing the Glaze
While your Pear Galettes are cooling, whisk together the powdered sugar, milk (or your favorite plant-based milk), a dash of cinnamon, and vanilla extract in a small bowl until you have a smooth, pourable glaze.
The Best Part: Time to Indulge!
Once your galettes have cooled a bit, drizzle that lovely glaze over them. These pear desserts are simply divine served warm or at room temperature. For an extra special treat, add a scoop of vanilla ice cream or a dollop of whipped cream. It’s the perfect ending to any meal, especially on a cool fall evening!

A Little Note on Nutrition
Please remember that the nutritional information provided is an estimate. Factors such as specific ingredients used, precise measurements, and preparation methods can all influence the final nutritional values.
Gentle Swaps for a Lighter Touch
- Sweetening Smarter: Instead of brown sugar, you can use a smaller amount of maple syrup or honey to sweeten the pears, or even a sugar substitute if you prefer. The natural sweetness of ripe pears often needs less added sugar.
- Exploring Different Pastries: While not traditional, you could try using a whole wheat puff pastry (if available) or even a homemade whole wheat pie crust for a fiber boost, making it a slightly healthier galette recipe.
- Adding More Fruit Love: Feel free to mix in other fruits like thinly sliced apples or berries with the pears to add more vitamins and antioxidants to your pear dessert.
My Favorite Ways to Serve Them Up
- These Pear Galettes are absolutely wonderful with a scoop of creamy vanilla bean ice cream that slowly melts into the warm fruit.
- For a delightful breakfast or brunch treat, serve them alongside a dollop of Greek yogurt mixed with a touch of honey and a sprinkle of granola.
- They make a charming addition to an autumn cheese board, pairing beautifully with a sharp cheddar or a soft, creamy brie.
A Few Little Baking Hiccups to Sidestep
- Don’t Overload Those Beauties! Don’t overload your pastry squares with too many pears. This can make your galette difficult to fold and lead to a soggy bottom. A thin, even layer is best for a crisp crust.
- The Secret to No Soggy Bottoms: Skipping the tablespoon of flour tossed with the pears can result in too much moisture being released during baking, making your pastry less flaky. This is a key tip for a golden, crisp crust.
- Patience Makes Perfect (Baking-wise!): Make sure your galettes are truly golden brown and puffed. If they’re pale, they might be doughy in the center. Give them the full time, or even a minute or two longer, to ensure they’re cooked through and deliciously flaky.
Keeping Your Galettes Fresh
Once cooled, these Easy Pear Galettes are best enjoyed within 1-2 days. Store them in an airtight container at room temperature. If you need to keep them longer, they can be refrigerated for up to 3-4 days. To warm them up, a few minutes in a moderate oven (around 300°F/150°C) will help crisp up the pastry again.
From My Kitchen to Yours
Baking these Pear Galettes always feels like a comforting hug, a sweet echo of family memories and simple joys. I hope as you make this pear galette recipe, you find as much warmth and delight in it as I do. May it inspire new stories and create cherished moments in your own kitchen, shared with those you hold dear.
Your Burning Questions, Answered!
Can I use different fruits for this lovely galette?
Absolutely! This galette recipe is wonderfully versatile. You can easily substitute the pears with thinly sliced apples, berries, or even stone fruits like peaches or plums when they are in season. Adjust the sugar and spices to your taste for each fruit.
How do I keep my galette crust from getting soggy?
The key is twofold: first, make sure your pears are thinly sliced to release less moisture. Second, don’t skip the tablespoon of flour tossed with the pears. This helps absorb any excess liquid during baking, ensuring your rustic pear galette has a beautifully crisp crust. Also, ensure your oven is at the correct temperature for thorough baking.
Can I prepare these galettes ahead of time for a special occasion?
You can assemble the galettes up to the point of baking and store them in the refrigerator for a few hours. Brush with egg wash just before baking. If you want to bake them completely ahead, they are best enjoyed the same day for optimal crispness, but can be rewarmed gently in the oven.
Print
Easy Pear Galettes – proven tips for a golden, crisp crust
- Total Time: 37 minutes
- Yield: 4–6 galettes 1x
- Diet: Vegetarian
Description
There’s something magical about a warm, flaky Easy Pear Galette with its golden crust and the sweet aroma of pears and cinnamon. This simple yet elegant dessert is perfect for any occasion, bringing warmth and comfort to every bite.
Ingredients
- 1 sheet puff pastry, thawed
- 2 ripe pears, thinly sliced (Bartlett or Bosc)
- 2 tablespoons brown sugar
- 1 teaspoon cinnamon
- 1/4 teaspoon nutmeg
- 1 teaspoon lemon juice
- 1 tablespoon all-purpose flour
- 1 egg, beaten (for egg wash)
- For the Glaze:
- 1/2 cup powdered sugar
- 1 tablespoon milk (or plant-based milk)
- 1/4 teaspoon cinnamon
- 1/4 teaspoon vanilla extract
Instructions
- Preheat the oven to 400°F (200°C) and line a baking sheet with parchment paper.
- Roll out the thawed puff pastry into a 12×12-inch square, then cut into 4–6 smaller squares.
- In a bowl, combine sliced pears with brown sugar, cinnamon, nutmeg, lemon juice, and flour. Toss gently.
- Spoon pear mixture into the center of each puff pastry square, leaving a 1-inch border.
- Fold edges up over the filling and brush with the beaten egg.
- Transfer to the baking sheet and bake 18–22 minutes, until golden and crisp.
- While baking, whisk powdered sugar, milk, cinnamon, and vanilla until smooth to make the glaze.
- Cool slightly and drizzle glaze over the galettes before serving.
- Enjoy warm or at room temperature with ice cream or whipped cream.
Notes
For a lighter version, try using maple syrup instead of sugar, or mix in other fruits like apples or berries. Store leftovers in an airtight container for 1–2 days or refrigerate up to 4 days.
- Prep Time: 15 minutes
- Cook Time: 22 minutes
- Category: Dessert
- Method: Baking
- Cuisine: American
Nutrition
- Serving Size: 1 galette
- Calories: 280
- Sugar: 18g
- Sodium: 120mg
- Fat: 14g
- Saturated Fat: 6g
- Unsaturated Fat: 7g
- Trans Fat: 0g
- Carbohydrates: 35g
- Fiber: 2g
- Protein: 4g
- Cholesterol: 45mg
Keywords: pear galette, easy dessert, rustic pear galette, puff pastry, pear recipe

